Want to collect native plant seed for sowing this fall/winter? We’ve got the scoop!

So you’ve decided you want to try grow your own native plants from seed. In this post, we offer advice on collecting, cleaning, and storing plant seed.
Start with species
Before you start collecting, you must decide what species of plants you want to grow, which is a more challenging decision than you might think and the subject of a separate Clean North blog post here.
Also check out our Sault/Algoma Grow Me Instead Guide here. It lists both plants native to the Sault/Algoma as well as plants native to other parts of Ontario that do well here and support pollinators/wildlife.
Want to learn how to winter sow native plants? Read a related Clean North blog post.
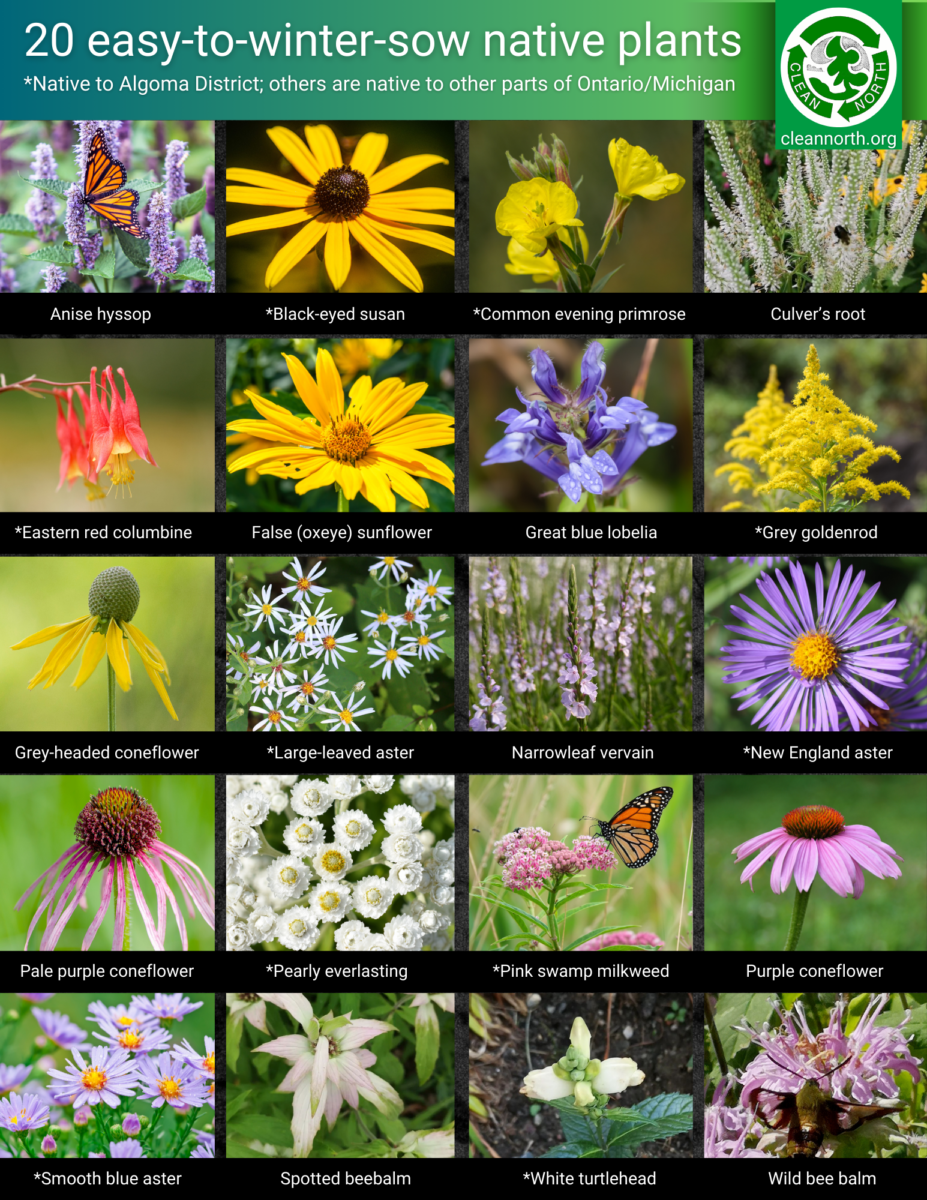
If you are looking for some sure-fire winners, consider one of the below species, which are relatively easy to germinate.
When to collect seed
Timing seed collection depends on when the plant produces a mature seed head, and that can vary by when the plant blooms. Early bloomers like columbine tend to produce seed heads earlier. Late bloomers like Joe-Pye weed, black-eyed Susan, or asters may not produce seed until mid-September through October or even November! Keep in mind:
- If you pick seed heads too soon (still green/moist), seeds may be immature or perform poorly.
- If you wait too long, seeds may have long since fallen to the ground, been eaten by critters or attacked by insects/fungi, or been blown away by the wind.
- Seed heads may not mature all at once. So to capture all the seed from a plant, you may need to return to it several times.
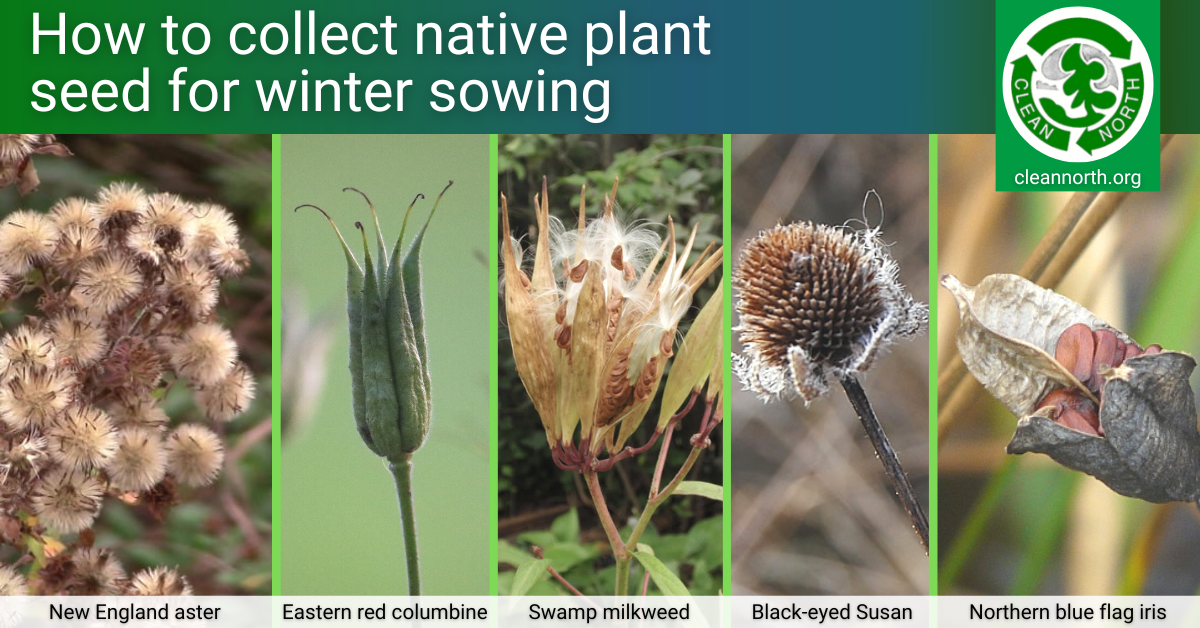
Signs of mature seed:
- Seed head/pod is dry and beige or brown (not green/moist)
- Seeds are beige, brown or black and are firm and dry (not green/moist)
- Seeds come easily out of the seed head or pod
If seed heads or pods are cracking/opening, some seed may have already dropped. At this point you can often still salvage some of it.
Where to collect seed
Be ethical about seed collection:
- It’s fine to collect seed from native plants on your property, but when on someone else’s land, ask permission.
- It’s unethical and illegal to collect seed from rare or endangered species in the wild.
- Parks and conservation areas have rules about what can be collected. Read regulations before you go. This Ontario Parks blog post explains why it’s illegal to forage in our provincial parks.
- Even with common native plants growing in the wild, never collect more than 10% of the seed in a given group of plants.
Scroll down for more options for accessing seed.
How to collect seed
- Gather some brown paper lunch bags (or paper grocery bags if you expect to harvest a large number of seed heads) and some clean, sharp scissors
- Snip mature, dry seed heads into the bags
- Mark the species on the outside of each bag using a waterproof garden marker—some people also like to record when and where they collected seed, especially if trading with others
How to clean seed
When you collect seed, you will likely end up with chaff (plant material other than seed) in your bags/envelopes. For example, seed of species like Joe-Pye weed, wild asters, and milkweed often comes with fluff. If you remove as much of the chaff as possible as you collect seed, you will reduce:
- the amount of space your seed take up
- the number of bags/envelopes you need to use
- the risk of seed being damaged by insects or mold/mildew hiding in the chaff
Tips for removing seed from chaff
How you clean your seed depends on the species and your level of patience and persistence, as well as personal preference. What works well for one person may be frustrating for someone else.
With species with relatively large seeds in pods—for example, northern blue flag iris, native lupine or false indigo—simply crack the dry pods open over a bowl or tray.
With species with tiny seeds—like those from foxglove, Culver’s root, columbine, bee balm, or great blue lobelia—try holding each seed head over a tray or bowl and shake or tap it gently to cause seeds to fall to the tray.
Various tools can be used to clean seed:
- Paper bag: Seal seed heads/pods in the bag and then shake it vigorously to loosen the seeds. Make sure it’s a quality bag that won’t leak seeds from the bottom seams; if it’s a cheap/leaky bag, tape seams. Then cut a tiny hole about the size of each seed in one bottom corner of the bag and gently shake seeds from that hole into a large bowl for further cleaning. If you have the time and want to get every seed, dump all of the bag contents into a tray or bowl and then pick out the chaff manually.
- Rolling pin: Use it to crush bagged seed heads/pods to release seeds (again, make sure the bag is sound and sealed). See end of paper bag instructions above for next steps.
- Sieves: For example, window screening is perfect for sieving chaff from columbine seed, and various sizes of hardware cloth, kitchen strainers, and spice jars can be helpful with seed of other native plants. You can also buy a set of commercial seed sieves.
- Salad spinner: Spinning seeds that have fluff attached can help remove the fluff quickly, but some salad spinners are better for this than others.
- Air (winnowing):
- Fold a sheet of paper in half lengthwise; pour seed/chaff on the paper; and hold paper at an angle; blow gently on the paper so the chaff goes uphill and the seeds stay put.
- Pour seed from one bowl into another with a breeze or fan on low (do outside to avoid blowing chaff all over your house). You can also hold a vacuum cleaner hose in one hand as you do this but be careful—it’s easy to vacuum up seed by mistake!
- With seeds attached to fluff (milkweed, Joe-Pye weed, asters), you use one hand to knead or toss around the ball of fluff in a bowl (see graphic below). And again, you can try holding a vacuum cleaner hose about 6-12 inches away to suck up fluff bits as they fly off the seed.
- Tweezers: If you have lots of time, you can pour seed heads directly onto a tray and clean the chaff out manually. Tweezers can be helpful. It’s oddly satisfying to clean seed this way, but it can be time consuming.
Consider wearing a face mask while cleaning seed as it can release a lot of fibres into the air, which may be irritating to airways.
Special caution about opening bags of milkweed seed indoors!
The fluff tends to separate from the seeds, and you can end up with the fluff flying all over your house. Again, having a vacuum cleaner hose running in one hand can help prevent fluff dispersing everywhere. Or clean it on your patio or deck.
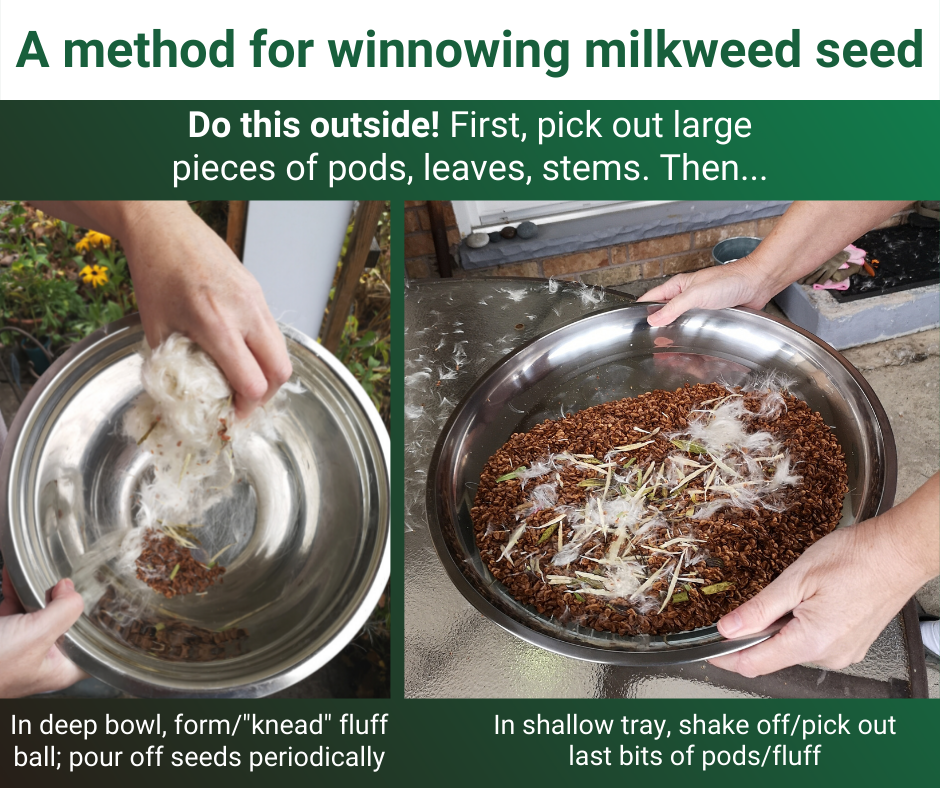
One of our volunteers needed to clean a lot of swamp milkweed seed in a hurry. A salad spinner is often recommended for milkweed seed but didn’t work for her; she suspects the slots in her spinner may be too small. After some trial and error, here’s what she says what finally worked (do this outside to avoid fluff flying all over your house):
- Pick out any large pieces of pods/leaves/stems
- Pour the remaining pile of fluff/seed into a deep bowl
- Grab the pile of fluff and “knead” it with one hand—rapidly and repeatedly turn the fluff ball over with your hand
- Stop periodically to pour seeds that have been funneled to the bottom of the bowl onto a shallow tray
- Shake the tray gently to release the last bits of fluff
- Pick out remaining pieces of fluff and stem
How to store seed
- Place in a clean, dry paper bag or a paper or glassine envelope (the kind stamps come in).
- Label with at least the species and date. If you will be sharing your seed with others, consider including where the seed was collected and source of the original plant. People who are trying to restore ecosystems may ask for this level of detail.
- Store in a cool, dry, dark place until ready to sow (avoid damp/humid environments).
Tip: Planning on swapping seeds with others or selling seed? Consider ordering small coin envelopes for this purpose.
What if you don’t want to collect your own seed?
Below are some alternatives to collecting your own seed.
Local/regional seed
Two outfits that sell at least some seed from native plants grown in our region are The Superior Gardener here in the Sault and Northern Wildflowers in Lively, Ontario. Seed from our area is more likely to produce plants adapted to our growing conditions (growing season length, min/max temperatures, etc.). If you want only native plants, make sure each species you’ve chosen is native to our area. Some sellers are still selling seed for invasive plants as “wildflowers”! Read more on what’s a native plant
You can also trade seed with other local gardeners. Consider joining a local horticultural society or Facebook gardening group to connect with others who grow native plants.
Other Canadian seed
You can also go further afield to buy seed from a producer elsewhere in Ontario or other parts of Canada. Most will likely do fine in our area, but it’s always wise to google species to confirm they’re native before buying (or check the Sault/Algoma Grow Me Instead Guide for suggestions).
Seed from other countries
If you have been gardening for a while, you probably know you can easily order seed from other countries or hop across the river to buy seed in Michigan. The problem here is you bypass important checks and balances to keep invasive plants and plant pests/diseases out of Canada. We encourage you to buy your seed from reputable Canadian suppliers.
And we especially discourage buying seed from individual sellers or Etsy shops based in other countries. The risk of getting seed for a species that is not what they say it is or is not viable is high. They could even be infected with an invasive pest or be seed for an invasive species.
“I’m ready to winter sow!”
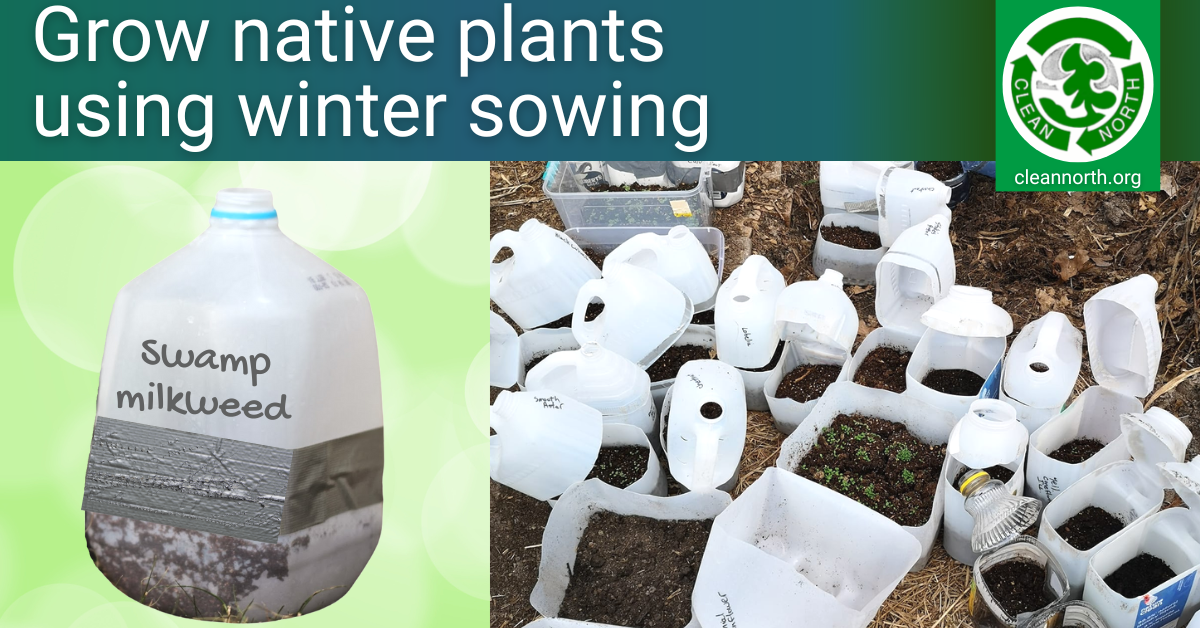
Please check out our blog post on growing native plants through winter sowing in containers.
Two other winter sowing methods:
- Sow directly onto prepared soil in late fall. Use recommended planting depth for each seed type. Be sure to label/record what you sowed where. To reduce critters eating direct-sowed seed, consider laying screening over the seed (remove as soon as snow melts in spring) or installing a barrier made of hardware cloth as a fence or cage around seeded areas.
- Germinate seeds using the refrigerator stratification method.
What if you want to buy native plants instead?
Some garden centres carry native plants, but be careful. Garden centre staff don’t always know which are native (especially which are native to Algoma!), which are cultivars/nativars so possibly less useful to pollinators, and which are flat-out invasive. Sadly, you can still buy invasive species like periwinkle and goutweed at most garden centres.
Ontario has some excellent online sellers of native plants, but some are pick up only (no shipping). One company that does a beautiful job of shipping live native plants is Ontario Native Plants.
Got questions?
Let us know: info@cleannorth.org.


2 thoughts on “Want to collect native plant seed for sowing this fall/winter? We’ve got the scoop!”
Comments are closed.