Want to grow native plants but can’t find any? Grow your own using winter sowing!

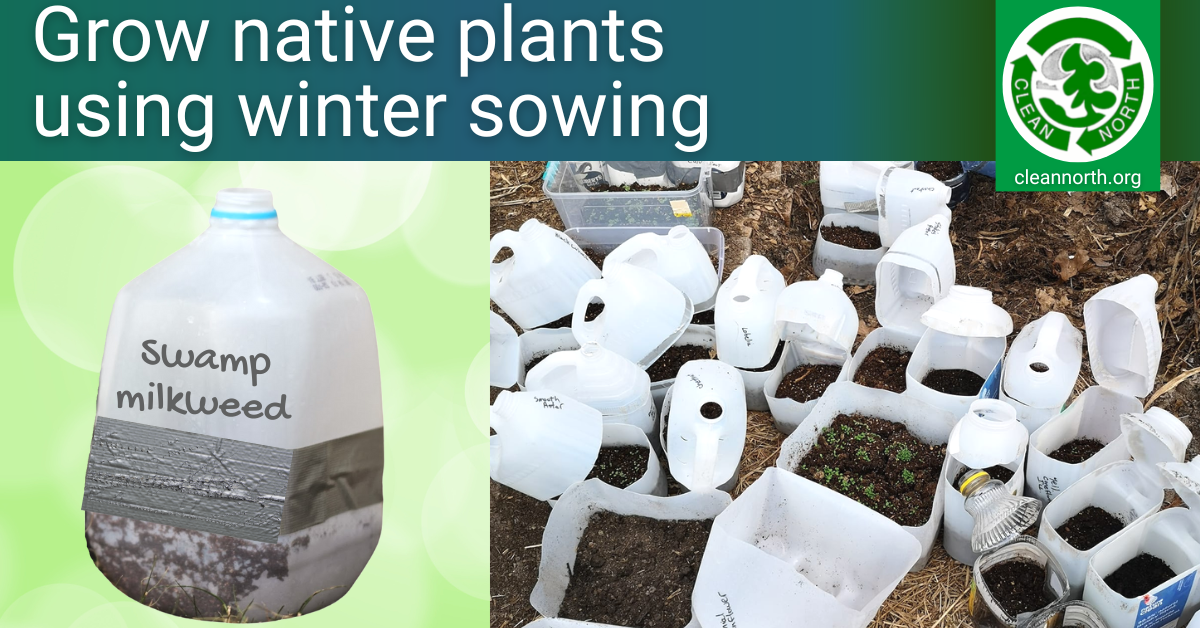
As part of our Invasive Plant Species Education Project, we urge gardeners to replace invasive plants with native ones. Native plants best support our native pollinators, birds, and other wildlife, while invasive plants cause harm. However, native plants can be hard to find at garden centres, so what’s an aspiring green gardener to do? Try winter sowing! This method is an easy and cheap way to grow native plants from seed at a low cost per plant. And it’s a great activity for a family, classroom, club, or childcare facility.
NEW! Printable step-by-step instructions for winter sowing native plant seeds
If you prefer watching a video, check out the recorded webinar below. If you’d rather read, keep scrolling!
Why winter sow?
The challenge with native plant seeds is to germinate (sprout), most must have a period of moist cold known as stratification. For some species, a month or even less of moist cold will do. Others need up to three months.
You can sow seeds directly onto prepared soil in fall or early winter and hope most don’t get eaten by rodents or rot. A layer of window screen will help protect seeds from predators but remember to lift it as soon as the snow melts.
You can also stratify native plant seeds in your refrigerator, on moist paper towels in ziploc bags, but many people don’t have a lot of extra space in their fridge. And why fill your fridge when you have nature’s refrigerator just outside your home?
What to plant
Before you decide what species to winter sow, bone up on what’s a native plant! Figuring that out can be trickier than you might expect. We recommend you read more about what’s a native plant here.
If you want to mimic nature as closely as possible, choose species confirmed to be native to our area and use seeds from local sources, as those will be best adapted to our conditions. But you can be less rigorous than that and still do good for our pollinators, birds, and other wildlife. Again, read more here.
Suggestions for native plant species to winter sow in the Sault/Algoma
Refer to the Sault/Algoma Grow Me Instead Guide. It lists both plants native to the Sault/Algoma as well as plants native to other parts of Ontario that do well here and support pollinators/wildlife.
Where to get native plant seeds
- The Superior Gardener, a Sault-based seed supplier, carries a few types of native plant seeds.
- Northern Wildflowers in Lively, Ontario has an excellent selection on their website.
- You can also join the Seeds of Change Facebook group or one of the three area horticultural societies (Sault Ste. Marie, Bruce Station, St. Joseph Island) and try trading seeds with other gardeners.
- We at Clean North sometimes have native plant seed available so email us at info@cleannorth.org and ask.
If you collect seed yourself, please do it ethically
- It’s illegal to collect seed in parks and protected areas and unethical to collect seeds of at-risk species in the wild.
- Get permission to collect on private land.
- Avoid collecting more than 5-10% of the seed in a given patch.
- Do not collect seed in another country and bring it into Canada or order seed from outside Canada. Doing so bypasses important safeguards to prevent new pests from entering our country.
Read our detailed blog post on collecting native plant seed.
Can I use winter sowing to start non-native plants early?
In many cases, yes. But check online to find out if a given non-native flower or vegetable species is suited to winter sowing and when to start it. It’s not worth the effort for every species. And double-check to make sure any non-native plants you start/plant are not invasive species.
What if I missed the winter window?
Native/pollinator plants germinate best when they get a 30-90 day period of moist cold, depending on the species. However, some species are tolerant of a short cold period, for example, milkweeds, asters, and purple coneflower. You may have luck with other species as well.
Sow as soon as possible and set pots outside to experience as much cold as possible. If you put them in the shade, say behind a cedar tree, they will stay cold/cool longer. Also, put them where they won’t get stepped on or kicked over.
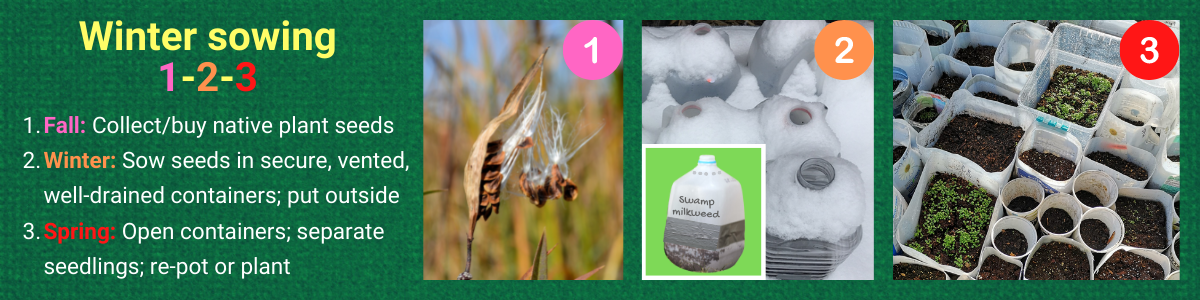
On to winter sowing! How to do it at a glance
What containers can you use?
- Clear milk jugs (most common container used in the U.S. but hard to find in Ontario)
- Clear juice jugs
- Vinegar jugs
- Distilled water jugs
- Wiper fluid jugs (readily available at gas stations in winter; rinse thoroughly)
- Clear 2 litre pop bottles
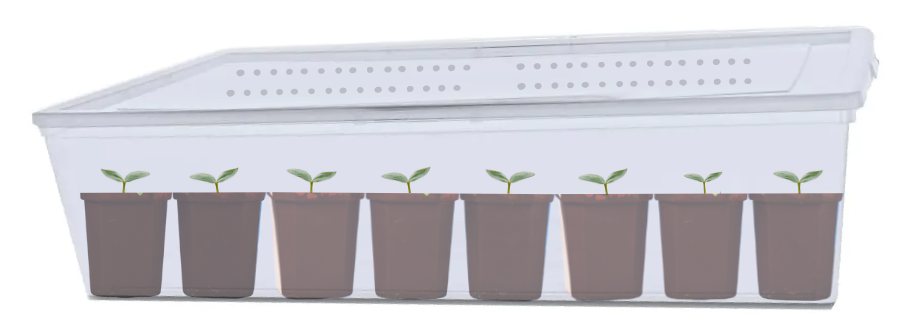
- Clear plastic bins with lids (clear lids are best but coloured ones will do)
- Large yogurt tubs (but must have a clear cover, for example, plastic wrap secured with an elastic band and a few poked snow/rain holes)
- For more ideas, check out:
How to prepare containers
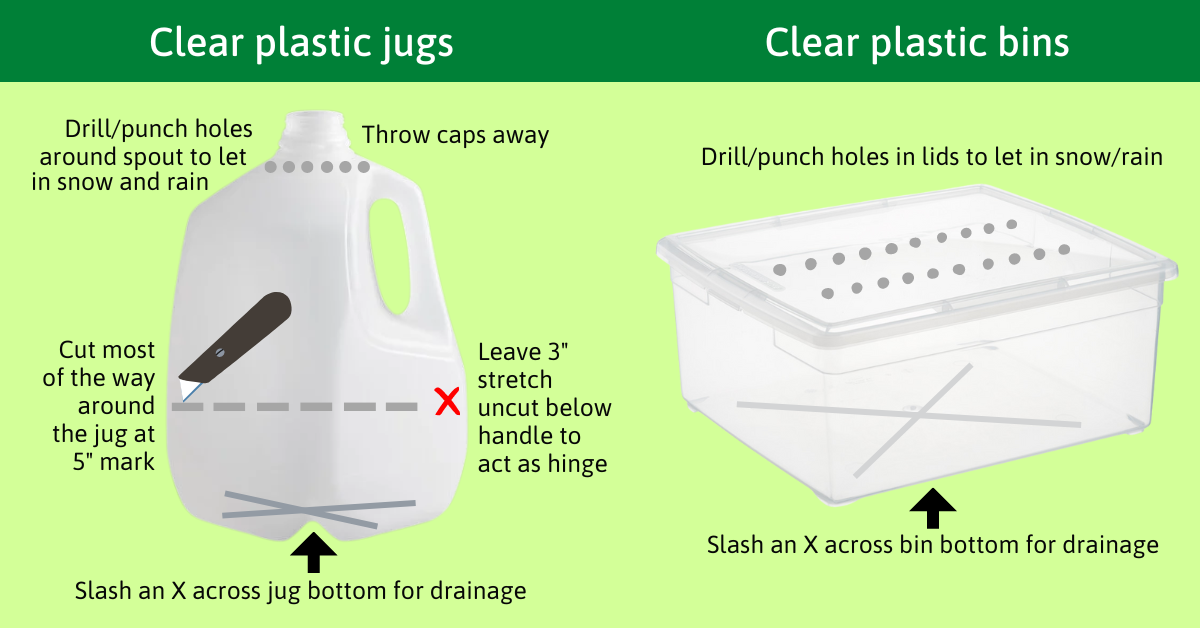
Whatever container you use, it must:
- Allow at least some light in
- Have holes for snow/rain to get in the top
- Have drain lines/holes in the bottom to prevent soil from becoming soggy
- Be sealed with duct tape or a lid to ward off rodents and other seed munchers
Filling containers
Sow early enough to allow 1-3 months of cold treatment. Species vary in requirements—some as little as 30 days, while others may need up to 90 days. Sowing in January-early February is a safe bet in the Sault/Algoma area. It’s ok if seeds stay in the containers longer than the minimum number of days.
Sowing steps:
- Fill the containers 4″ deep with moist but not wet commercial potting mix (not soil from your yard)
- Tamp soil down lightly and level it
- Check individual species’ requirements for seed depth online
- Sow seeds all across the soil surface (will result in many but crowded seedlings) or place a few seeds at a time 1-2″ away from each other (fewer, easier-to-separate seedlings)
- Water soil till moist but not soggy
After sowing:
- Seal jugs using duct tape
- Place lids on bins, secure plastic with holes in it over yogurt cups, etc.
- Use a garden marker (regular Sharpies are not weatherproof) to write species names on containers (not on tape as it could fall off)
- Place containers outdoors where they will get snowed/rained on:
- Shade is better to prevent overheating in early spring
- Avoid high traffic areas to prevent people, pets, or your snowblower knocking over containers
- If using jugs or pots, brace them or put in trays to prevent tipping
Now wait till spring!
When to open containers
When temperatures start rising above 0ºC (32 F.) in spring, open jugs and remove bin lids during the day to prevent overheating. When temperatures are consistently above 0ºC day and night, cut tops off jugs and remove bin lids. The optimal location is one that has morning sun and afternoon shade to avoid “cooking” tender young plants.
Carefully monitor containers/soil moisture in spring. If seeds are consistently dry, they may not germinate. If they are consistently soggy, they may rot. If new sprouts get too hot inside a sealed container, they may die. It’s a delicate balancing act. Some guidelines…
- Remember that soil should be moist but not soggy, like a wrung-out sponge.
- If soil look dry on top, water lightly.
- The more cold the better, but some thawing during winter is likely ok.
- If possible, put containers in the shade or on the north side of a building to prevent overheating if you get a warm spell. Avoid roof overhangs, which may prevent rain/snow from hitting the containers).
- If you get multiple days in a row with temps over 5 C/40 F, consider removing lids during the day to help prevent any emerging seedlings from “cooking”—especially if containers are in full sun. If temps are consistently above freezing 24/7, remove lids permanently.
When to make your move
Once seedlings have their first set of true leaves, you have three options:
- Transplant seedlings into the ground, either individually or in small clumps
- Separate seedlings into individual plants or small clumps and re-plant into individual pots to grow up a bit more—this way you end up with a lot more plants
- Leave where they are till they get larger and you are ready to plant
Separating seedlings is easier if soil is slightly dry. A plastic fork can be helpful to tease plants apart. But have a spray bottle of water handy to keep roots moist after you separate them. Delicate seedling roots do not like to dry out!
You can also use a metal spatula to divide the soil in containers into brownie-sized sections, plant each of these “brownies,” and let “survival of the fittest” play out.
Keep in mind that native plants:
- Can vary widely in their preferred conditions; one might thrive in clay soil while another is intolerant of it; some tolerate occasional flooding while others don’t; some tolerate part shade while others do not
- Can get much taller in your yard than they do in the wild thanks to richer soil, consistent watering, etc.
- Will be hardy but may need some looking after especially in the first 2 years
- Can take 2-3 years to flower
To give your native plants the best chance of surviving and thriving, read up on what conditions (soil type, moisture, light levels, etc.) each species prefers.
Questions?
Email us at info@cleannorth.org.
Thank you to…
…the Invasive Species Centre for giving us a microgrant for our Invasive Species Education Project. The Bruce Station Horticultural Society has given us financial support as well. And we have a long list of local partners who offer expertise and cheer us on:
- Sault Naturalists (especially Valerie Walker and Peter Burtch)
- The Kensington Conservancy (especially Carter Dorscht)
- Sault College School of Natural Environment
- SSM Region Conservation Authority
- City of Sault Ste. Marie
- Lake Superior Watershed Conservancy
- Bruce Station, St. Joseph Island, and Sault Ste. Marie horticultural societies
- Seedy Saturday Algoma
- Algoma Master Gardeners
- Johnson Farmers Market


2 thoughts on “Want to grow native plants but can’t find any? Grow your own using winter sowing!”
Comments are closed.